Using terminal for playing youtube music and videos

Sorry for my slow bandwidth speed (3G mobile) firstly.
I hope this short clip helps Mabox Herbolth 22.02 users to run youtube music & videos from a cli (command line) terminal, for it has been installed by default for this nice version. If you want to learn more details about using ytfzf script command line please check here : GitHub - pystardust/ytfzf: A posix script to find and watch youtube videos from the terminal. (Without API)
Mis disculpas por la lentitud de mi banda de internet (3G movil) primeramente.
Espero que este video corto ayude a todos los que disfrutamos la ultima version de Mabox Herbolth 22.02 para reproducir los videos y la musica de youtube desde una(s) linea(s) de comandos en la terminal. Si ustedes desean mayores detalles para usar el script de linea de comando ytfzf revisen aqui por favor: GitHub - pystardust/ytfzf: A posix script to find and watch youtube videos from the terminal. (Without API)

tuto_mb1

13 Likes

Hi @ben_chile , very nice :slight_smile:
How did you place cava on bottom? Is it thanks to custom terminator profile with full transparency?

Also your cava config is interesting - some kind of gradients.
Thanks for video :slight_smile:

4 Likes

Hello :slight_smile:
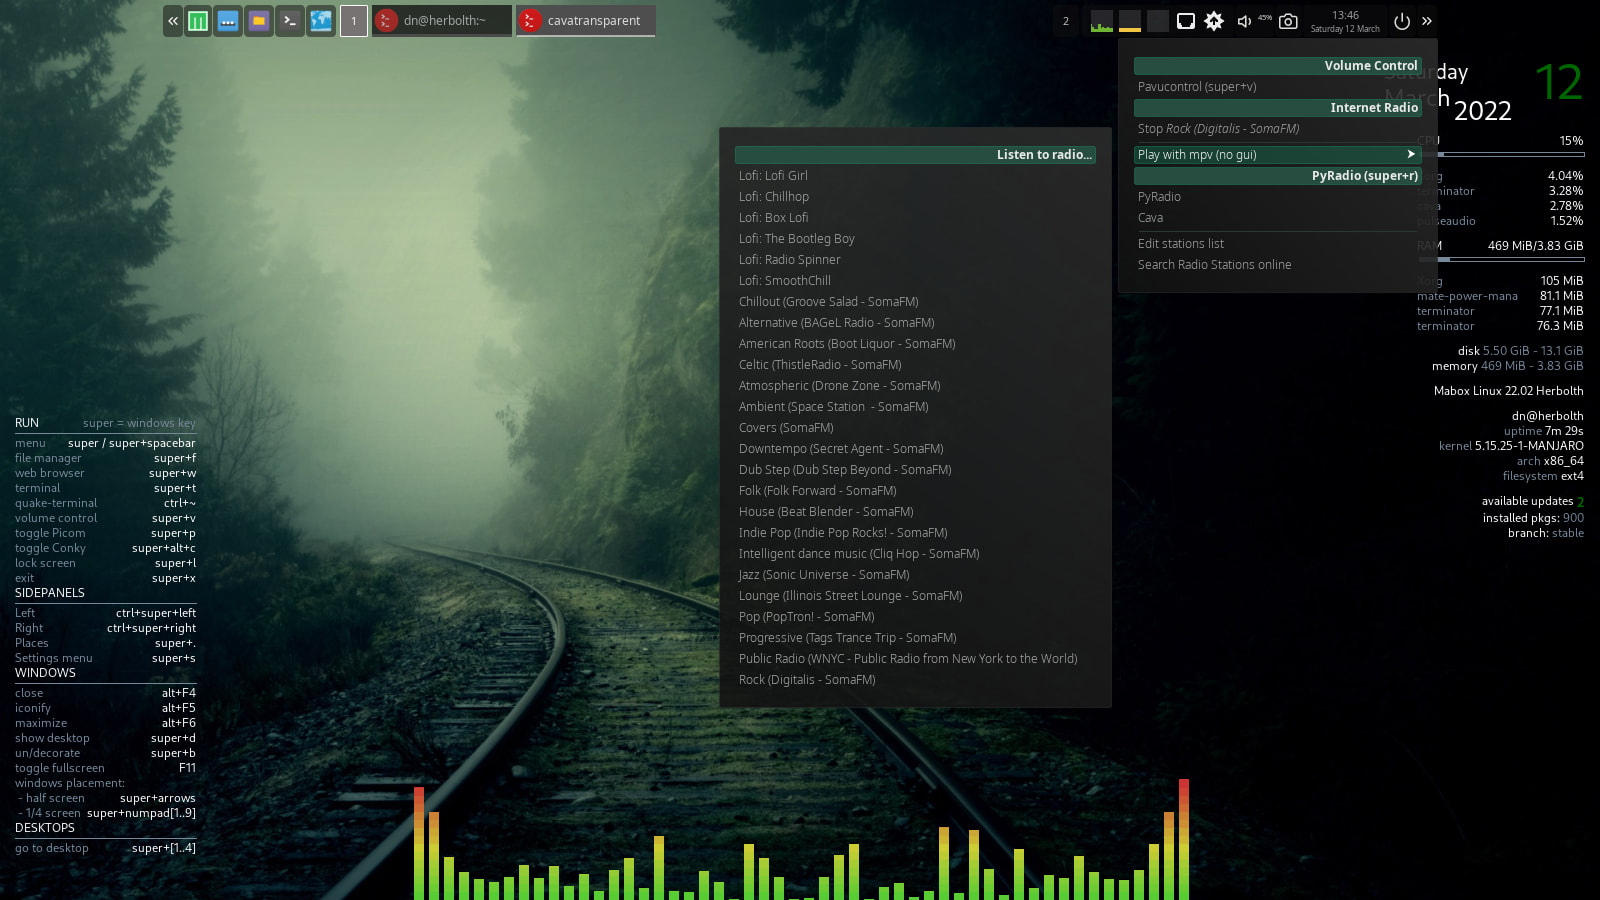
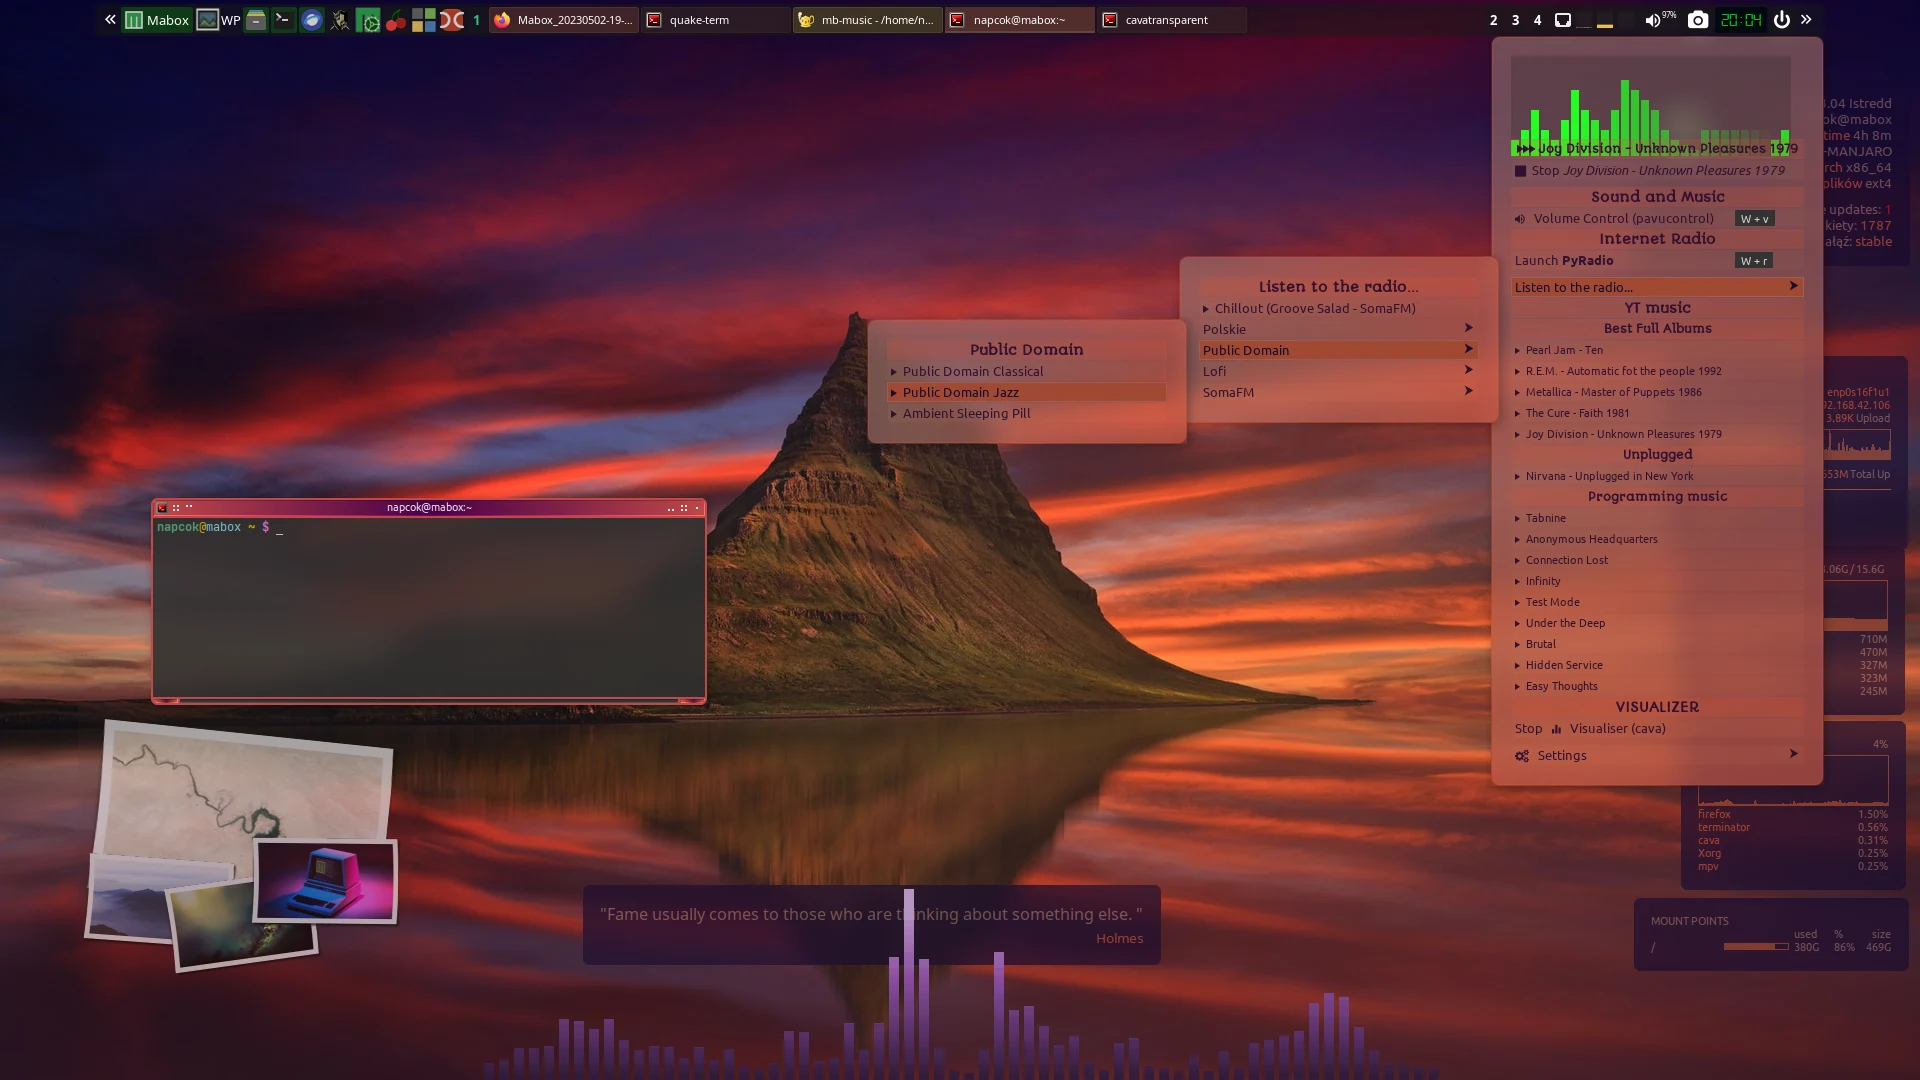
I managed to write a little script to run cava in transparent terminator profile.
Please test it if you can…

#!/bin/bash
#: Usage: transparent-cava (height in pixels) (width full or half)
#: example transparent-cava 100 half
#: default is 200px height and full width

CONFIG_DIR="$HOME/.config/terminator"
CONFIG_FILE="$CONFIG_DIR/cava-transparent"
if [ ! -f $CONFIG_FILE ]; then
cat <<EOF > ${CONFIG_FILE}
[global_config]
  dbus = False
[keybindings]
[profiles]
  [[default]]
    allow_bold = False
    background_darkness = 0.0
    background_type = transparent
    cursor_blink = False
    cursor_color = "#aaaaaa"
    font = Sans 4
    show_titlebar = False
    scrollbar_position = hidden
    scroll_on_keystroke = False
    use_custom_command = True
    custom_command = cava
    use_system_font = False
[layouts]
[plugins]
EOF
fi

CAVA_HEIGHT=${1:-200}
CAVA_WIDTH=${2:-full}
WIDTH=$(wmctrl -d|grep "*"|awk '{print $4}'|cut -d'x' -f1)
HEIGHT=$(wmctrl -d|grep "*"|awk '{print $4}'|cut -d'x' -f2)
TOP=$((HEIGHT-CAVA_HEIGHT))
LEFT=0
if [ "$CAVA_WIDTH" != "full" ];then
LEFT=$((WIDTH/4))
WIDTH=$((WIDTH/2))
else
:
fi 

terminator -b -g "${CONFIG_FILE}" -T cavatransparent --geometry "${WIDTH}x${CAVA_HEIGHT}+${LEFT}+${TOP}"

Please save above code as transparent-cava in ~/bin directory, make it executable and test.
Usage:

transparent-cava #without arguments it defaults to 200px height and full width
transparent-cava 100 half # 100px height half width

Picom must be enabled to have transparency effect.

Cava config I use

~/.config/cava/config

## Configuration file for CAVA. Default values are commented out. Use either ';' or '#' for commenting.
## Modified by benChile for Mabox
[general]

# Smoothing mode. Can be 'normal', 'scientific' or 'waves'. DEPRECATED as of 0.6.0
; mode = normal

# Accepts only non-negative values.
; framerate = 60

# 'autosens' will attempt to decrease sensitivity if the bars peak. 1 = on, 0 = off
# new as of 0.6.0 autosens of low values (dynamic range)
# 'overshoot' allows bars to overshoot (in % of terminal height) without initiating autosens. DEPRECATED as of 0.6.0
; autosens = 1
; overshoot = 20

# Manual sensitivity in %. If autosens is enabled, this will only be the initial value.
# 200 means double height. Accepts only non-negative values.
; sensitivity = 100

# The number of bars (0-200). 0 sets it to auto (fill up console).
# Bars' width and space between bars in number of characters.
; bars = 0
; bar_width = 2
; bar_spacing = 1


# Lower and higher cutoff frequencies for lowest and highest bars
# the bandwidth of the visualizer.
# Note: there is a minimum total bandwidth of 43Mhz x number of bars.
# Cava will automatically increase the higher cutoff if a too low band is specified.
; lower_cutoff_freq = 50
; higher_cutoff_freq = 10000


# Seconds with no input before cava goes to sleep mode. Cava will not perform FFT or drawing and
# only check for input once per second. Cava will wake up once input is detected. 0 = disable.
; sleep_timer = 0


[input]

# Audio capturing method. Possible methods are: 'pulse', 'alsa', 'fifo', 'sndio' or 'shmem'
# Defaults to 'pulse', 'alsa' or 'fifo', in that order, dependent on what support cava was built with.
#
# All input methods uses the same config variable 'source'
# to define where it should get the audio.
#
# For pulseaudio 'source' will be the source. Default: 'auto', which uses the monitor source of the default sink
# (all pulseaudio sinks(outputs) have 'monitor' sources(inputs) associated with them).
#
# For alsa 'source' will be the capture device.
# For fifo 'source' will be the path to fifo-file.
# For shmem 'source' will be /squeezelite-AA:BB:CC:DD:EE:FF where 'AA:BB:CC:DD:EE:FF' will be squeezelite's MAC address
; method = pulse
; source = auto

; method = alsa
; source = hw:Loopback,1

; method = fifo
; source = /tmp/mpd.fifo
; sample_rate = 44100
; sample_bits = 16

; method = shmem
; source = /squeezelite-AA:BB:CC:DD:EE:FF

; method = portaudio
; source = auto


[output]

# Output method. Can be 'ncurses', 'noncurses' or 'raw'.
# 'noncurses' uses a custom framebuffer technique and draws only changes
# from frame to frame. 'ncurses' is default if supported
#
# 'raw' is an 8 or 16 bit (configurable via the 'bit_format' option) data
# stream of the bar heights that can be used to send to other applications.
# 'raw' defaults to 200 bars, which can be adjusted in the 'bars' option above.
; method = ncurses

# Visual channels. Can be 'stereo' or 'mono'.
# 'stereo' mirrors both channels with low frequencies in center.
# 'mono' outputs left to right lowest to highest frequencies.
# 'mono_option' set mono to either take input from 'left', 'right' or 'average'.
; channels = stereo
; mono_option = average

# Raw output target. A fifo will be created if target does not exist.
; raw_target = /dev/stdout

# Raw data format. Can be 'binary' or 'ascii'.
; data_format = binary

# Binary bit format, can be '8bit' (0-255) or '16bit' (0-65530).
; bit_format = 16bit

# Ascii max value. In 'ascii' mode range will run from 0 to value specified here
; ascii_max_range = 1000

# Ascii delimiters. In ascii format each bar and frame is separated by a delimiters.
# Use decimal value in ascii table (i.e. 59 = ';' and 10 = '\n' (line feed)).
; bar_delimiter = 59
; frame_delimiter = 10


[color]

# Colors can be one of seven predefined: black, blue, cyan, green, magenta, red, white, yellow.
# Or defined by hex code '#xxxxxx' (hex code must be within ''). User defined colors requires
# ncurses output method and a terminal that can change color definitions such as Gnome-terminal or rxvt.
# if supported, ncurses mode will be forced on if user defined colors are used.
# default is to keep current terminal color
; background = white
; foreground = green


# Gradient mode, only hex defined colors (and thereby ncurses mode) are supported,
# background must also be defined in hex  or remain commented out. 1 = on, 0 = off.
# You can define as many as 8 different colors. They range from bottom to top of screen
 gradient = 1
 gradient_count = 8
 gradient_color_1 = '#59cc33'
 gradient_color_2 = '#80cc33'
 gradient_color_3 = '#a6cc33'
 gradient_color_4 = '#cccc33'
; gradient_color_5 = '#cca633'
; gradient_color_6 = '#cc8033'
; gradient_color_7 = '#cc5933'
; gradient_color_8 = '#cc3333'


[smoothing]

# Percentage value for integral smoothing. Takes values from 0 - 100.
# Higher values means smoother, but less precise. 0 to disable.
; integral = 77

# Disables or enables the so-called "Monstercat smoothing" with or without "waves". Set to 0 to disable.
; monstercat = 0
; waves = 0

# Set gravity percentage for "drop off". Higher values means bars will drop faster.
# Accepts only non-negative values. 50 means half gravity, 200 means double. Set to 0 to disable "drop off".
; gravity = 100


# In bar height, bars that would have been lower that this will not be drawn.
; ignore = 0


[eq]

# This one is tricky. You can have as much keys as you want.
# Remember to uncomment more then one key! More keys = more precision.
# Look at readme.md on github for further explanations and examples.
; 1 = 1 # bass
; 2 = 1
; 3 = 1 # midtone
; 4 = 1
; 5 = 1 # treble

After some more testing and integration with tint2 volume executor menu I plan to ship it with mabox-tools update.
@ben_chile big thanks for the idea and sharing important info :slight_smile:

7 Likes

Hello dear @napcok I am giving it a try this Sat afternoon and will let you know how it does… Chaltumay

3 Likes

:grinning:
Super!!

4 Likes

Perfectly running in here as well:

5 Likes

works fine here but for my dual screen setup I needed to change lines 39 & 40:

LEFT=$((WIDTH/8))
WIDTH=$((WIDTH/4))

This gives me a half width display on the left monitor
To put it on the right monitor:

LEFT=$(((WIDTH/8)*5))
WIDTH=$((WIDTH/4))
5 Likes

Today’s latest mabox update included new transparent-cava script by default and this could be checked & managed from right click mouse/touchpad audio icon new menu from the panel, so one can enable and disable this new visualizer cava feature from this menu when audio output is on.

Thanks for that full weekend work @napcok

5 Likes

OH yeah, worked really well, but how to achieve coloured cava?

1 Like

Hi @paulie,

Click here to see and copy cava config with gradients
## Configuration file for CAVA. Default values are commented out. Use either ';' or '#' for commenting.
## Modified by benChile for Mabox
[general]

# Smoothing mode. Can be 'normal', 'scientific' or 'waves'. DEPRECATED as of 0.6.0
; mode = normal

# Accepts only non-negative values.
; framerate = 60

# 'autosens' will attempt to decrease sensitivity if the bars peak. 1 = on, 0 = off
# new as of 0.6.0 autosens of low values (dynamic range)
# 'overshoot' allows bars to overshoot (in % of terminal height) without initiating autosens. DEPRECATED as of 0.6.0
; autosens = 1
; overshoot = 20

# Manual sensitivity in %. If autosens is enabled, this will only be the initial value.
# 200 means double height. Accepts only non-negative values.
; sensitivity = 100

# The number of bars (0-200). 0 sets it to auto (fill up console).
# Bars' width and space between bars in number of characters.
; bars = 0
; bar_width = 2
; bar_spacing = 1


# Lower and higher cutoff frequencies for lowest and highest bars
# the bandwidth of the visualizer.
# Note: there is a minimum total bandwidth of 43Mhz x number of bars.
# Cava will automatically increase the higher cutoff if a too low band is specified.
; lower_cutoff_freq = 50
; higher_cutoff_freq = 10000


# Seconds with no input before cava goes to sleep mode. Cava will not perform FFT or drawing and
# only check for input once per second. Cava will wake up once input is detected. 0 = disable.
; sleep_timer = 0


[input]

# Audio capturing method. Possible methods are: 'pulse', 'alsa', 'fifo', 'sndio' or 'shmem'
# Defaults to 'pulse', 'alsa' or 'fifo', in that order, dependent on what support cava was built with.
#
# All input methods uses the same config variable 'source'
# to define where it should get the audio.
#
# For pulseaudio 'source' will be the source. Default: 'auto', which uses the monitor source of the default sink
# (all pulseaudio sinks(outputs) have 'monitor' sources(inputs) associated with them).
#
# For alsa 'source' will be the capture device.
# For fifo 'source' will be the path to fifo-file.
# For shmem 'source' will be /squeezelite-AA:BB:CC:DD:EE:FF where 'AA:BB:CC:DD:EE:FF' will be squeezelite's MAC address
; method = pulse
; source = auto

; method = alsa
; source = hw:Loopback,1

; method = fifo
; source = /tmp/mpd.fifo
; sample_rate = 44100
; sample_bits = 16

; method = shmem
; source = /squeezelite-AA:BB:CC:DD:EE:FF

; method = portaudio
; source = auto


[output]

# Output method. Can be 'ncurses', 'noncurses' or 'raw'.
# 'noncurses' uses a custom framebuffer technique and draws only changes
# from frame to frame. 'ncurses' is default if supported
#
# 'raw' is an 8 or 16 bit (configurable via the 'bit_format' option) data
# stream of the bar heights that can be used to send to other applications.
# 'raw' defaults to 200 bars, which can be adjusted in the 'bars' option above.
; method = ncurses

# Visual channels. Can be 'stereo' or 'mono'.
# 'stereo' mirrors both channels with low frequencies in center.
# 'mono' outputs left to right lowest to highest frequencies.
# 'mono_option' set mono to either take input from 'left', 'right' or 'average'.
; channels = stereo
; mono_option = average

# Raw output target. A fifo will be created if target does not exist.
; raw_target = /dev/stdout

# Raw data format. Can be 'binary' or 'ascii'.
; data_format = binary

# Binary bit format, can be '8bit' (0-255) or '16bit' (0-65530).
; bit_format = 16bit

# Ascii max value. In 'ascii' mode range will run from 0 to value specified here
; ascii_max_range = 1000

# Ascii delimiters. In ascii format each bar and frame is separated by a delimiters.
# Use decimal value in ascii table (i.e. 59 = ';' and 10 = '\n' (line feed)).
; bar_delimiter = 59
; frame_delimiter = 10


[color]

# Colors can be one of seven predefined: black, blue, cyan, green, magenta, red, white, yellow.
# Or defined by hex code '#xxxxxx' (hex code must be within ''). User defined colors requires
# ncurses output method and a terminal that can change color definitions such as Gnome-terminal or rxvt.
# if supported, ncurses mode will be forced on if user defined colors are used.
# default is to keep current terminal color
; background = white
; foreground = green


# Gradient mode, only hex defined colors (and thereby ncurses mode) are supported,
# background must also be defined in hex  or remain commented out. 1 = on, 0 = off.
# You can define as many as 8 different colors. They range from bottom to top of screen
 gradient = 1
 gradient_count = 8
 gradient_color_1 = '#59cc33'
 gradient_color_2 = '#80cc33'
 gradient_color_3 = '#a6cc33'
 gradient_color_4 = '#cccc33'
; gradient_color_5 = '#cca633'
; gradient_color_6 = '#cc8033'
; gradient_color_7 = '#cc5933'
; gradient_color_8 = '#cc3333'


[smoothing]

# Percentage value for integral smoothing. Takes values from 0 - 100.
# Higher values means smoother, but less precise. 0 to disable.
; integral = 77

# Disables or enables the so-called "Monstercat smoothing" with or without "waves". Set to 0 to disable.
; monstercat = 0
; waves = 0

# Set gravity percentage for "drop off". Higher values means bars will drop faster.
# Accepts only non-negative values. 50 means half gravity, 200 means double. Set to 0 to disable "drop off".
; gravity = 100


# In bar height, bars that would have been lower that this will not be drawn.
; ignore = 0


[eq]

# This one is tricky. You can have as much keys as you want.
# Remember to uncomment more then one key! More keys = more precision.
# Look at readme.md on github for further explanations and examples.
; 1 = 1 # bass
; 2 = 1
; 3 = 1 # midtone
; 4 = 1
; 5 = 1 # treble

Save it as ~/.config/cava/config
This file is provided by @ben_chile, thanks :slight_smile:

5 Likes

is there a keybinding or command that launches cava transparent if i dont use tint2?

Currently there is a wrapper:

transparent-cava

it runs cava inside specially configured (transparent and borderless) terminator.

If you like to run Music/Sound menu from somewhere (main menu/sidepanel for example)
command is:

mb-music -s

so for putting it somwhere in menu:

Label,mb-music -s

Btw. I am working on this dynamic menu, and it will be improved greatly in coming days/weeks

Prototype :arrow_down: :wink:

5 Likes